
Snipping Tool Shortcut Chromebook: Simple Full Guide
Taking screenshots on different devices can feel confusing, especially for people who switch between Windows, macOS, and ChromeOS. Many users search for the snipping tool shortcut Chromebook and wonder how it compares to Windows. This guide explains everything clearly in simple steps so you can capture anything on your screen without stress.
Chromebooks work in a different way than Windows laptops. They don’t have a traditional Snipping Tool app. Instead, they include a built-in feature called Screen Capture, which handles screenshots and screen recording. Once you know the shortcuts, screenshotting becomes very simple.
This guide covers all the Chromebook screenshot methods, where images are saved, how to fix shortcut issues, and how it compares to Windows.
- What Is the Snipping Tool on a Chromebook?
- Snipping Tool Shortcut Chromebook
- How to Use the Snipping Tool on Chromebook (Step-by-Step)
- Where Are Chromebook Screenshots Saved?
- Chromebook Screen Recording (Bonus Tip)
- Popular Screenshot Extensions for Chromebook
- Troubleshooting Screenshot Shortcuts on Chromebook
- Chromebook vs Windows Snipping Tool (Quick Comparison)
- Final Thoughts
- People Also Ask
What Is the Snipping Tool on a Chromebook?
Chromebooks don’t use a separate Snipping Tool app. Instead, they use the Screen Capture tool.
It can:
- Capture full-screen images
- Capture a selected area
- Capture a specific window
- Record your screen
It is built directly into ChromeOS, so you don’t need extra software.
Once you activate Screen Capture, a small toolbar appears at the bottom of the screen. From there, you can choose the mode you want. It’s simple, fast, and works the same way on almost all Chromebook models.
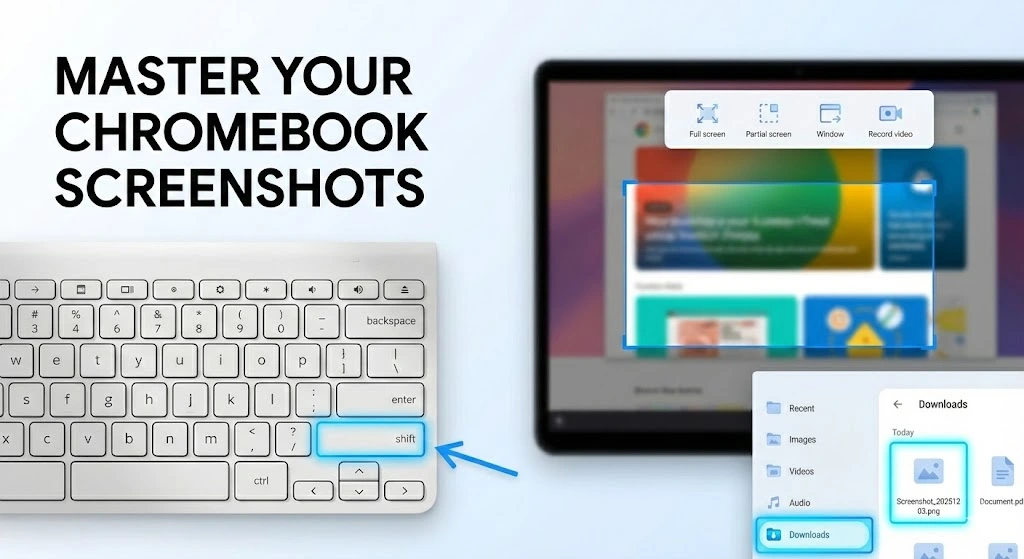
Snipping Tool Shortcut Chromebook
Full-Screen Screenshot

Shortcut Key
Ctrl + Show Windows
The Show Windows key looks like a rectangle with two small lines. It sits on the top row of every Chromebook keyboard.
This shortcut captures your whole screen and saves it automatically in the Downloads folder. It works even if multiple windows are open.
For users with external keyboards, the “Show Windows” key is often replaced with the F5 key.
Partial Screenshot (Closest to Windows Snipping Tool)

Shortcut Key
Ctrl + Shift + Show Windows
This is the real snipping tool shortcut Chromebook owners look for.
When you press the shortcut, your cursor turns into a crosshair.
Now you can click and drag to capture any part of your screen:
- A section of a webpage
- A dialog box
- A small area you want to highlight
This is the best option when you want clean and focused screenshots.
Window Screenshot

Shortcut Key
Press Ctrl + Show Windows
Tap Tab to switch to window capture
Click the window you want to capture
This captures only the selected window. It’s helpful when you have many tabs or apps open but need only one.
How to Use the Snipping Tool on Chromebook (Step-by-Step)

- Press Shift + Ctrl + Show Windows
- The Screen Capture toolbar will open
- Pick the screenshot mode:
- Full screen
- Partial
- Window
- For a partial screenshot, drag the mouse to choose an area
- A small preview will appear on the bottom right
- Click the preview to open or edit your screenshot
All captured images save automatically.
Where Are Chromebook Screenshots Saved?

By default, all screenshots go into the Downloads folder.
To find them:
- Open the Files app
- Click Downloads
- Your images will be there with the date and time
You can move them to Google Drive or any custom folder you prefer.
Chromebook Screen Recording (Bonus Tip)
Chromebooks also let you record your screen without installing extra apps.
To record:
- Press Shift + Ctrl + Show Windows
- Choose the video icon
- Pick full screen or partial area
- Start recording
Your video will be saved in the Downloads folder.
Screen recording is very helpful for tutorials and classwork.
Popular Screenshot Extensions for Chromebook

While the built-in tool is enough for most users, these extensions offer extra editing options:
Lightshot
- Easy to use
- Has drawing tools
- Upload screenshots online
Nimbus Screenshot
- Great for notes and blur tools
- Also supports screen recording
Awesome Screenshot
- Best for capturing whole web pages
- Useful for long articles
These extensions are optional but helpful if you need more editing power.
Troubleshooting Screenshot Shortcuts on Chromebook

If shortcuts stop working, try these checks:
1. Wrong key pressed
Make sure you’re using:
- Ctrl + Show Windows
- Ctrl + Shift + Show Windows
2. External keyboard issues
Some external keyboards don’t have a Show Windows key.
Try using F5 instead.
3. Screenshot not saving
Check the Downloads folder and confirm there’s enough storage.
4. System settings
Open Settings → Device → Keyboard
Check if you changed any key behavior.
Chromebook vs Windows Snipping Tool (Quick Comparison)
| Feature | Chromebook | Windows 10/11 |
|---|---|---|
| Access Method | Built-in keyboard shortcuts | Separate Snipping Tool + Print Screen key |
| Full Screen Capture | Ctrl + Show Windows | Print Screen or Windows + Print Screen |
| Partial Screenshot | Ctrl + Shift + Show Windows | Snipping Tool → New → Rectangular Snip |
| Window Capture | Ctrl + Show Windows + Tab | Alt + Print Screen or Snipping Tool |
| Automatic Saving | Yes, to Downloads folder | Manual save required |
| File Format | PNG (default) | PNG, GIF, JPEG, HTML |
| Editing Tools | Basic edit from notification | Full annotation tools |
| Delay Timer | No | Yes (1–5 seconds) |
| Screen Recording | Built-in | Extra software needed |
| Cloud Integration | Google Drive | OneDrive |
| Notification System | Instant popup preview | Snipping Tool window only |
| Learning Curve | Easy (simple shortcuts) | Medium (separate app) |
| System Performance | Lightweight | Extra app overhead |
Chromebooks actually offer faster shortcuts because everything is built into the system.
Final Thoughts
Once you learn the snipping tool shortcut Chromebook uses, taking screenshots becomes simple. The built-in Screen Capture tool is fast, clean, and works without installing anything. Whether you’re a student, teacher, or office user, these shortcuts will save time and help you capture exactly what you need.
Spend a few minutes practicing the three main shortcuts. After that, capturing your screen will feel natural.